

How to Calibrate Torque on PowerNet LT
Calibration of torque is recommended to be performed at a minimum of every six months. Calibration is a simple process taking only 10-15 minutes, and ensures quality, repeatable results from your dynamometer.
Note: In order to perform any calibration, you must have Administrator
access.
9 Steps to Calibrate Torque
1. Make sure there is no torque being applied to the dynamometer.
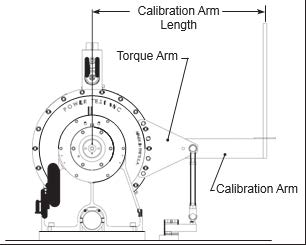
2. Attach the calibration arm to the torque arm of the dynamometer
3. From the LT controller Interface, click “Calibrate” under the tools menu.
4. Locate the “Torque” line in the Calibrations window (shown below) and zero torque by clicking the “Zero Offset” button.

5. Stack a known amount of weight on the calibration arm (200 lbs. is recommended). The calibration is the weight multiplied by the calibration arm length, in feet, as measured from the center of the dynamometer shaft. For example, 200 lbs. of weight and a 3-foot calibration arm length will result in a calibration torque value of 600 ft-lbs.
6. If the torque calibration is correct, no change is needed and calibration is complete. If the displayed torque value is incorrect, complete the remaining steps.
7. Type the calibrations torque value into the text box by “Torque” and then click the “Adjust Gain” button. The “Adjust Gain” button will only become active when a number is entered in the box and enough torque is being applied to the dynamometer.
Important: To prevent erroneous calibration, the “Adjust Gain” button will only become active when a torque value is entered into the box and enough force is being applied to the torque sensor you are calibrating.
8. Remove weights and calibration arm from the dynamometer.
9. Go back to the calibration window and zero torque again by click “Zero Offset” on the “Torque” line.
That’s it! Those are the 9 steps to completing torque calibration in PowerNet LT. For more information or tech support you can contact us at any time.